Laser Engraving Transparent Materials with CNC Lasers
Translucent and Transparent Materials
When laser light arrives at an object, it can interact with this object in several different ways. The interaction depends on the intrinsic properties of the material as well as the wavelength of the laser. Each object interacts with photons by a combination of transmission, reflection and absorption.
Transparency is a physical property of materials, which means that light can travel through an object without scattering (on a macroscopic scale). A transparent material is a material that appears clear and of a single color. Examples of transparent materials include plate glass and amorphous plastics (e.g. acrylics, PEI, PC, ABS, PS, etc.). Films of certain crystalline polymers, such as PET and PP, are also transparent as a result of being stretched in two directions (and thus bi-axially oriented), which aligns the polymer molecules in the film’s plane. There is consequently no refraction because of this alignment.
Translucent materials, on the other hand, allow only a portion of light to pass through them. Photons that pass through a translucent object are repeatedly scattered and change their direction several times. As a result, you cannot see clearly through such an object and an item placed on the opposite side of a translucent sheet appears fuzzy and unclear. Examples of translucent objects include tinted car glass, frosted glass and many plastics. In general for plastics, as the percentage crystallinity increases, the manufactured plastic sheet becomes gradually less clear. Crystallinity for plastics can stretch from 0% (totally amorphous) to 100% (totally crystalline), but a crystalline polymer is never 100% crystalline and forms adjacent amorphous and crystalline regions instead. Semi-crystalline or crystalline polymers can be translucent or opaque as a consequence of differences in refractive indices between the amorphous and crystalline regions (e.g. nylon, PE, PET, PBT, PP, etc.). Translucent acrylic sheets are popular for sign making as they are excellent for backlighting.
Overall, the clarity of the plastic produced can vary for a particular polymer, depending on the production method (e.g. random polymerisation yields plastics with higher clarity) or its modifications by usage of additives (clarifiers and nucleators) that act upon the size and growth of the crystal structure. Production steps such as heat treatment, mechanical processing and coloration affect optical properties of a particular plastic as well. Blue hue, for example, causes blue laser light to be reflected from the surface of the plastic, but the overall effect depends on the tint or shade of a particular color. What’s more, plastics with glossy surfaces are generally difficult to laser engrave. Light transmittance also depends on the material thickness. Hence numerous polymers in the form of thin films can have good optical transmittance. Furthermore, absence of cracks, voids and other structural defects accounts for excellent optical transmission. Nevertheless, any chemical change in plastic oxidation, degradation or diffusion may adversely impact material transparency.
All in all, a material that has good transparency will have low haze and high transmittance. Haze is defined as the incident light percentage that is scattered by more than 2.5° through an object. The lower the haze value, the higher the object’s clarity.
Explore Our Selection of Laser Engraving Products Ideal for Engraving Transparent Materials
Laser Engraving Translucent and Transparent Materials
You can laser engrave translucent and transparent materials, but the result depends on reflection (glossiness), light transmittance and haze of a particular material. Materials with high light transmittance cause blue laser light to simply pass through it. However, you can bypass this issue by adding a layer that stops laser light and concentrates the energy at a point where you want to engrave the surface. Nonetheless, there is no foolproof solution and all laser engraving requires some testing before you find an appropriate method that works for you.
")
The result obtained depends on a few parameters:
-
The material you want to laser engrave. Different translucent and transparent materials require different settings.
-
The choice of the light stopping surface layer. This can for instance be a permanent marker, paint or tape.
-
Your laser focus setting
-
Your laser lens
-
Engraving speed
-
Laser power
Method 1 - Addition of a Dark/Black Layer Underneath the Transparent Material to be Laser Engraved
You can add a dark or black layer directly beneath the object, and then calibrate the working distance to make the laser beam focus at their interface. The concentrated laser power engraves the transparent material at this interface. The results obtained vary depending on the object thickness, purity and haze as well as power and speed of your laser head. This method works best if you use a flat transparent object.
This method is not suitable for laser engraving transparent non-flat objects like bottles or drinking glasses in combination with a rotary axis.
 - Method 1")
Working distance should be calibrated in such a way so that the position of the laser focus overlaps with the interface between the dark layer and the glass.
For working distance calibration please refer to the PLH3D-6W-Series Laser Heads Manual as well as the following video:
Method 2 - Addition of a Dark/Black Surface Layer on Top of the Transparent Material to be Laser Engraved
This is the most commonly used solution. In this case, a dark surface layer concentrates the laser energy on the upper surface of the transparent material to be laser engraved. There are various types of surface layers you can utilize, all of which give different results. Examples include tape, permanent marker or paint. There is no ideal solution, as the choice of this layer depends on what results are desirable for you. If you use this method, you should calibrate the working distance in such a way that the laser focuses at the dark surface layer. Proper working distance calibration is crucial. The results obtained vary depending on the choice of the transparent material you want to laser engrave, the choice of the dark layer as well as the speed and power of your laser head.

Working distance should be calibrated in such a way so that the position of the laser focus overlaps with the interface between the dark layer and the glass.
Testing Different Methods
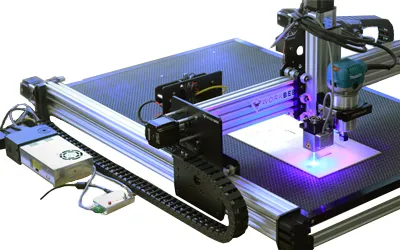
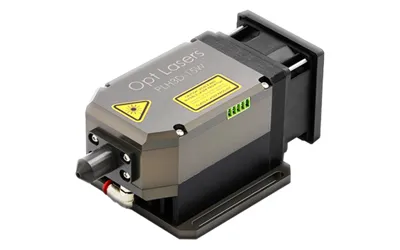
All tests, showing laser engraving transparent materials, were done using Opt Lasers PLH3D-6W-XF Laser Head with the uSpot Lens Upgrade.
Method 1: Laser Engraving Glass by Placing a Sheet of Glass on Top of a Black Material
For this test, a transparent sheet of glass to be laser engraved was placed on top of a black metal sheet. Please remember that you need to calibrate the working distance of your laser in such a manner so that the focal spot of the laser is positioned at the interface between the black metal sheet and the transparent glass. It is important to appropriately calibrate the working distance. The results obtained are shown below.


As shown above, this method yields satisfactory results. Please note that the engravement is on the rear side of the glass. The pictures below show the laser engraved glass using a USB camera microscope.


Method 1: Laser Engraving Acrylic Using a White Sheet of Paper as the Bottom Layer
The first step is to lay down a white sheet of paper on a flat surface. Working distance should be calibrated in such a manner so that the position of the laser focus overlaps with the interface between the paper and the glass. Next, you need to place a sheet of transparent acrylic on top of the white sheet of paper. You need to select appropriate parameters for engraving. Satisfactory results can be produced with 100% laser power at 1000 mm/min.


You can cleanse the engraved lettering on the underside with isopropanol or other alcohol.


Method 2: Laser Engraving Glass Using Permanent Marker as Top Layer

This glass was laser engraved at 80% power and 40 mm/s. It is worth noting that it is challenging to obtain an even layer using a permanent marker. The results may however vary, depending on the marker type.

Once the transparent glass is laser engraved, you can remove the marker ink using acetone or nail polish remover. A portion of the ink may however remain in the engraving.
Method 2: Laser Engraving Glass Using Acrylic Spray Paint as Top Layer

A thin layer of Acrylic Spray Paint was sprayed on the upper surface of the glass. A period of 30 minutes elapsed before proceeding with laser engraving so that the spray could dry. Next, the glass was laser engraved at 100% power and 30 mm/s. The results obtained are shown below.

The dark spray can be removed with hot water. It is crucial that you cleanse the laser engraved transparent glass as soon as possible. Waiting only makes it harder to remove.

This method gave the most satisfactory result. It is important to note that this method can be utilized for laser engraving non-flat objects like a bottle (using a rotary axis). The engravement obtained is also free of remaining ink and has a sand-blasted feel to it.
Method 2: Laser Engraving Glass Using Acrylic Spray Paint as Top Layer and a Rotary Axis


This glass was laser engraved at 100% power and 30 mm/s. The multiple laser engravings shown arise from performing multiple tests on the same glass until a satisfactory final result was obtained.


Laser Engraving Glass Mirror
To laser engrave a glass mirror, you need to follow the steps below.
-
Prepare a conventional, second surface mirror. Such a mirror has a reflective surface behind a transparent substrate such as acrylic or glass and is solid-colored on the backside.
-
Prepare an image to be laser engraved that has a good contrast. You can use for example the greyscale method for engraving.
-
Next, you need to reverse (mirror) this image so that once it is laser engraved on the back side of the mirror, the mirror can display the image correctly.
-
The mirror shown in this example was engraved with 0-100% power at 5000 mm/min, but a different choice of settings may work better. You may discover that you don’t need so much power, although it was found that using 20% of laser power at 5000 mm/min is insufficient to laser engrave this mirror.
-
The mirror does not need to be prepared in any special way. You can just place the mirror under the laser with the mirror side facing down. Laser must point towards the solid side.
-
Now you can laser engrave the mirror.
-
Once the engraving is finished, use a wiping cloth to clean the dust left behind.

-
You can then choose a color of your liking and paint transparent parts of the engraving. A permanent marker is good enough, but you can also use black spray or latex paint applied with a brush.
-
Now let it dry and flip the mirror. The mirror is now ready to be used as a decoration.

How to Choose an Appropriate CNC Machine Upgrade Kit for a Particular CNC Machine?
Specially for you, we have prepared a website that guides the user through the process of selecting a laser head and then leads to the appropriate set for your CNC machine. Click the button below to visit this website.
We would like to offer our special thanks to Øyvind Sætre Amundsen and Peter Lydman for laying the groundwork for this article, which included finding out and testing how to laser engrave transparent materials as well as writing initial text for the "Laser Engraving Transparent and Translucent Materials", "Testing Different Methods" and "Laser Engraving Glass Mirror" sections, which was later worked upon and edited by our Web Development Team.